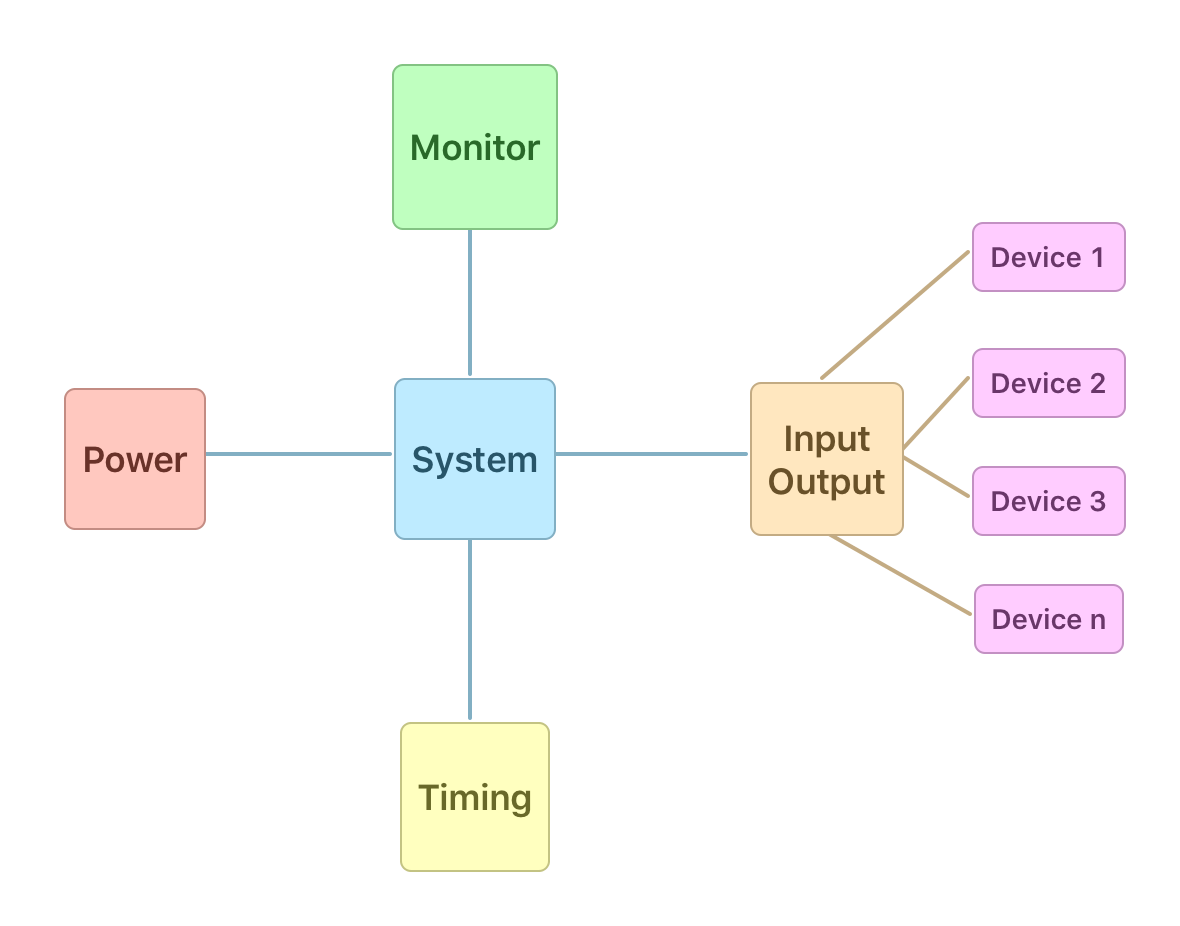
The system design of the Whizz-80 computer is a little different to what most people seem to be creating. There are many designs of a z80 computer that are based around a single board. While a single board self contained computer is cool and trendy, it doesn’t really give you the flexibility to upgrade, change or expand the system when you want to try something new or add extra functionality. I’m intending on the system to grow and expand as I develop it (it is iterative process as I learn, so mistakes would be made). Because of this I am deciding to use a modular approach and have divided up the computer into 5 distinct core modules. These modules are:
- Power
- Timing
- System
- IO Bus
- Monitor

Each module is designed to be self-contained and can be swapped out with a different (upgraded or fixed) module as required. For example you could swap out the timing module of a slow clock cycle to a faster one, or a manual clock cycle (push button), without impacting the design of the rest of the computer. If I need to up the power requirements I can simply change the power module. If I need more IO output ports or change the entire way input/output is performed then I can swap out this module without affecting the rest of the system.
The system design and concept is heavily influenced by this webpage. I have taken ideas from this page and have extended it for my own purposes.
Here is a brief description of each module. I will be going into more detail about each individual module as they are built.
Power module
The power module supplies power to the whole system design. Output of this module is to the System board, and consists of +5v, ground and any reset signals. I’ve linked the reset signal to the power board as resets are generally associated with power on/off and restarts. I may create a sub-module of the power module for reset as there are different ways to perform a reset function. (I may need a reset and a /reset signal).
Timing Module
Outputs to the system module. Receives power and /wait /m1 signals (for manual clock controls). Provides a clock signal to the system board (and any other devices as required). From a simple single step push button, 555 timers, crystal circuits, and all the way up to a 2Mhz oscillator. I am capping the max speed that I intend to build for to 2Mhz as the faster you make the signals, the more important it becomes with the length of your wires between ICs and interference. I’m not interested in fast clock speeds.
System Module
This is the critical module in the system design as it contains the z80 CPU and memory circuits (ROM/RAM) and any other circuitry required to manage the core system components such as some IO logic circuitry that helps hand off any signals to any other modules (such as the IO Bus module). All other modules connect to the main system module. It is the central module (see diagram above).
IO Bus Module
This module contains the I/O Bus where extra peripherals modules are connect to. It is designed to allow multiple input/output devices to be connected to it via their own ‘sub-module’ card. As this is such an important module (it is the interface to the outside world), more detail would be given on this module later.
Monitor Module
This module is used for debugging the system. Displays the address, data and control buses in a nice format for debugging. It is not a system dependant module, i.e. this module can be removed and the system is still fully functional, you just won’t be able to see the buses. (If you are running a fast clock speed then you won’t need to watch the bus anyway).
System Design
This is a rather simplified description of the Whizz-80 system, and it only the electronic hardware. This system design is also in a state of flux, as the design may change as new ideas are tested. I am not going to build an enclosure yet as I don’t even know what the final version (if there is one) will look like.
Hopefully I can look back on these blog posts and see how the Whizz-80 system had evolved over time.