After trying different z80 assemblers and simulators, I have found a z80 development workflow that works well for me on my mac .
There are quite a few open source tools to use, and finding the right combination has really improved my z80 assembly learning.
The z80 development workflow
I have come up with the following workflow:
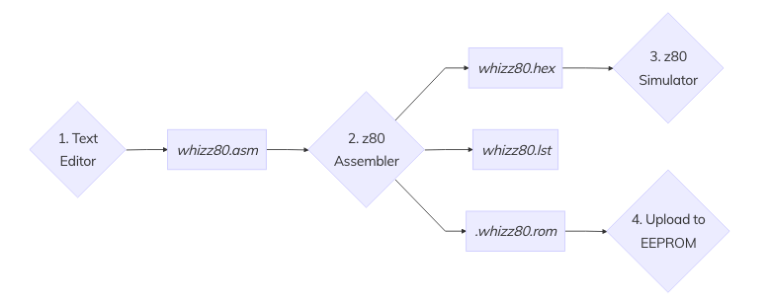
There are four stages of my work flow. If it looks similar to a edit/compile/debug cycle then you are right.
1. Text Editor
You need a way to write your z80 code. Any text editor will do really, however I am currently using vim. I don’t have any syntax highlighting setup as of yet, as I haven’t found a suitable one as of yet (maybe I should create my own). All my code is saved as .asm files.
2. z80 Assembler
Once you have your .asm files you need to assemble them using an assembler. I am currently using zasm which seems to be one of the better ones with full documentation and is actively being developed. What separates zasm from other assemblers is that it has some features that I may use in the future, such as macros, that other assemblers didn’t support or was clunky.
More importantly, zasm can also output Intel Hex so I can run in a simulator (more about that below) as well as raw binary files ready for EEPROM uploading. zasm also produces a nice source listing file for later reading and checking.
3. z80 Simulator
I am currently using the z80 simulator from the z80pack suite. I am only using the z80sim component. Why am I not using the z80asm assembler from the z80pack suite? It doesn’t appear to support assembler macros, and it is a rather simple assembler, with a small number of features. There was a limited amount of documentation to get me started with it.
The z80sim application only supports 2 formats, the Intel Hex format and a ‘mostek header’ format which the z80asm in the suite outputs, and zasm (my preferred assembler) does not. It does however output Intel Hex files so that’s why I’m doing that.
The z80pack simulator is nice as you can set software breakpoints and manipulate the z80 memory, registers and flags as you step through your code. It also has a nice text input and text output interface (using port 1) for debugging output devices.
I did come across another z80 simulator which looked really nice and with a tty terminal front end to display all the z80 registers, memory, etc, however I couldn’t get it to compile on my mac (suspect its a 64-bit thing), and I didn’t really want to run a separate virtual Linux machine just to run a simulator.
4. Upload to EEPROM
Once I’m happy with my program, and I want to do some real testing on real hardware I re-assemble my code into a binary file (rather than the hex format I use for the simulator). This allows me to upload the raw data file into my EEPROM programmer, and then insert the EEPROM into my Whizz80 computer system so I can see it running.
I haven’t uploaded any EEPROM code as of yet as the hardware is still being developed, but I’ll be providing more details about my EEPROM programming at a later date.
I’ve also documented this z80 development workflow on the new whizz80 website.